Blog
Sometimes I write, sometimes it's worth reading. Check it out below.
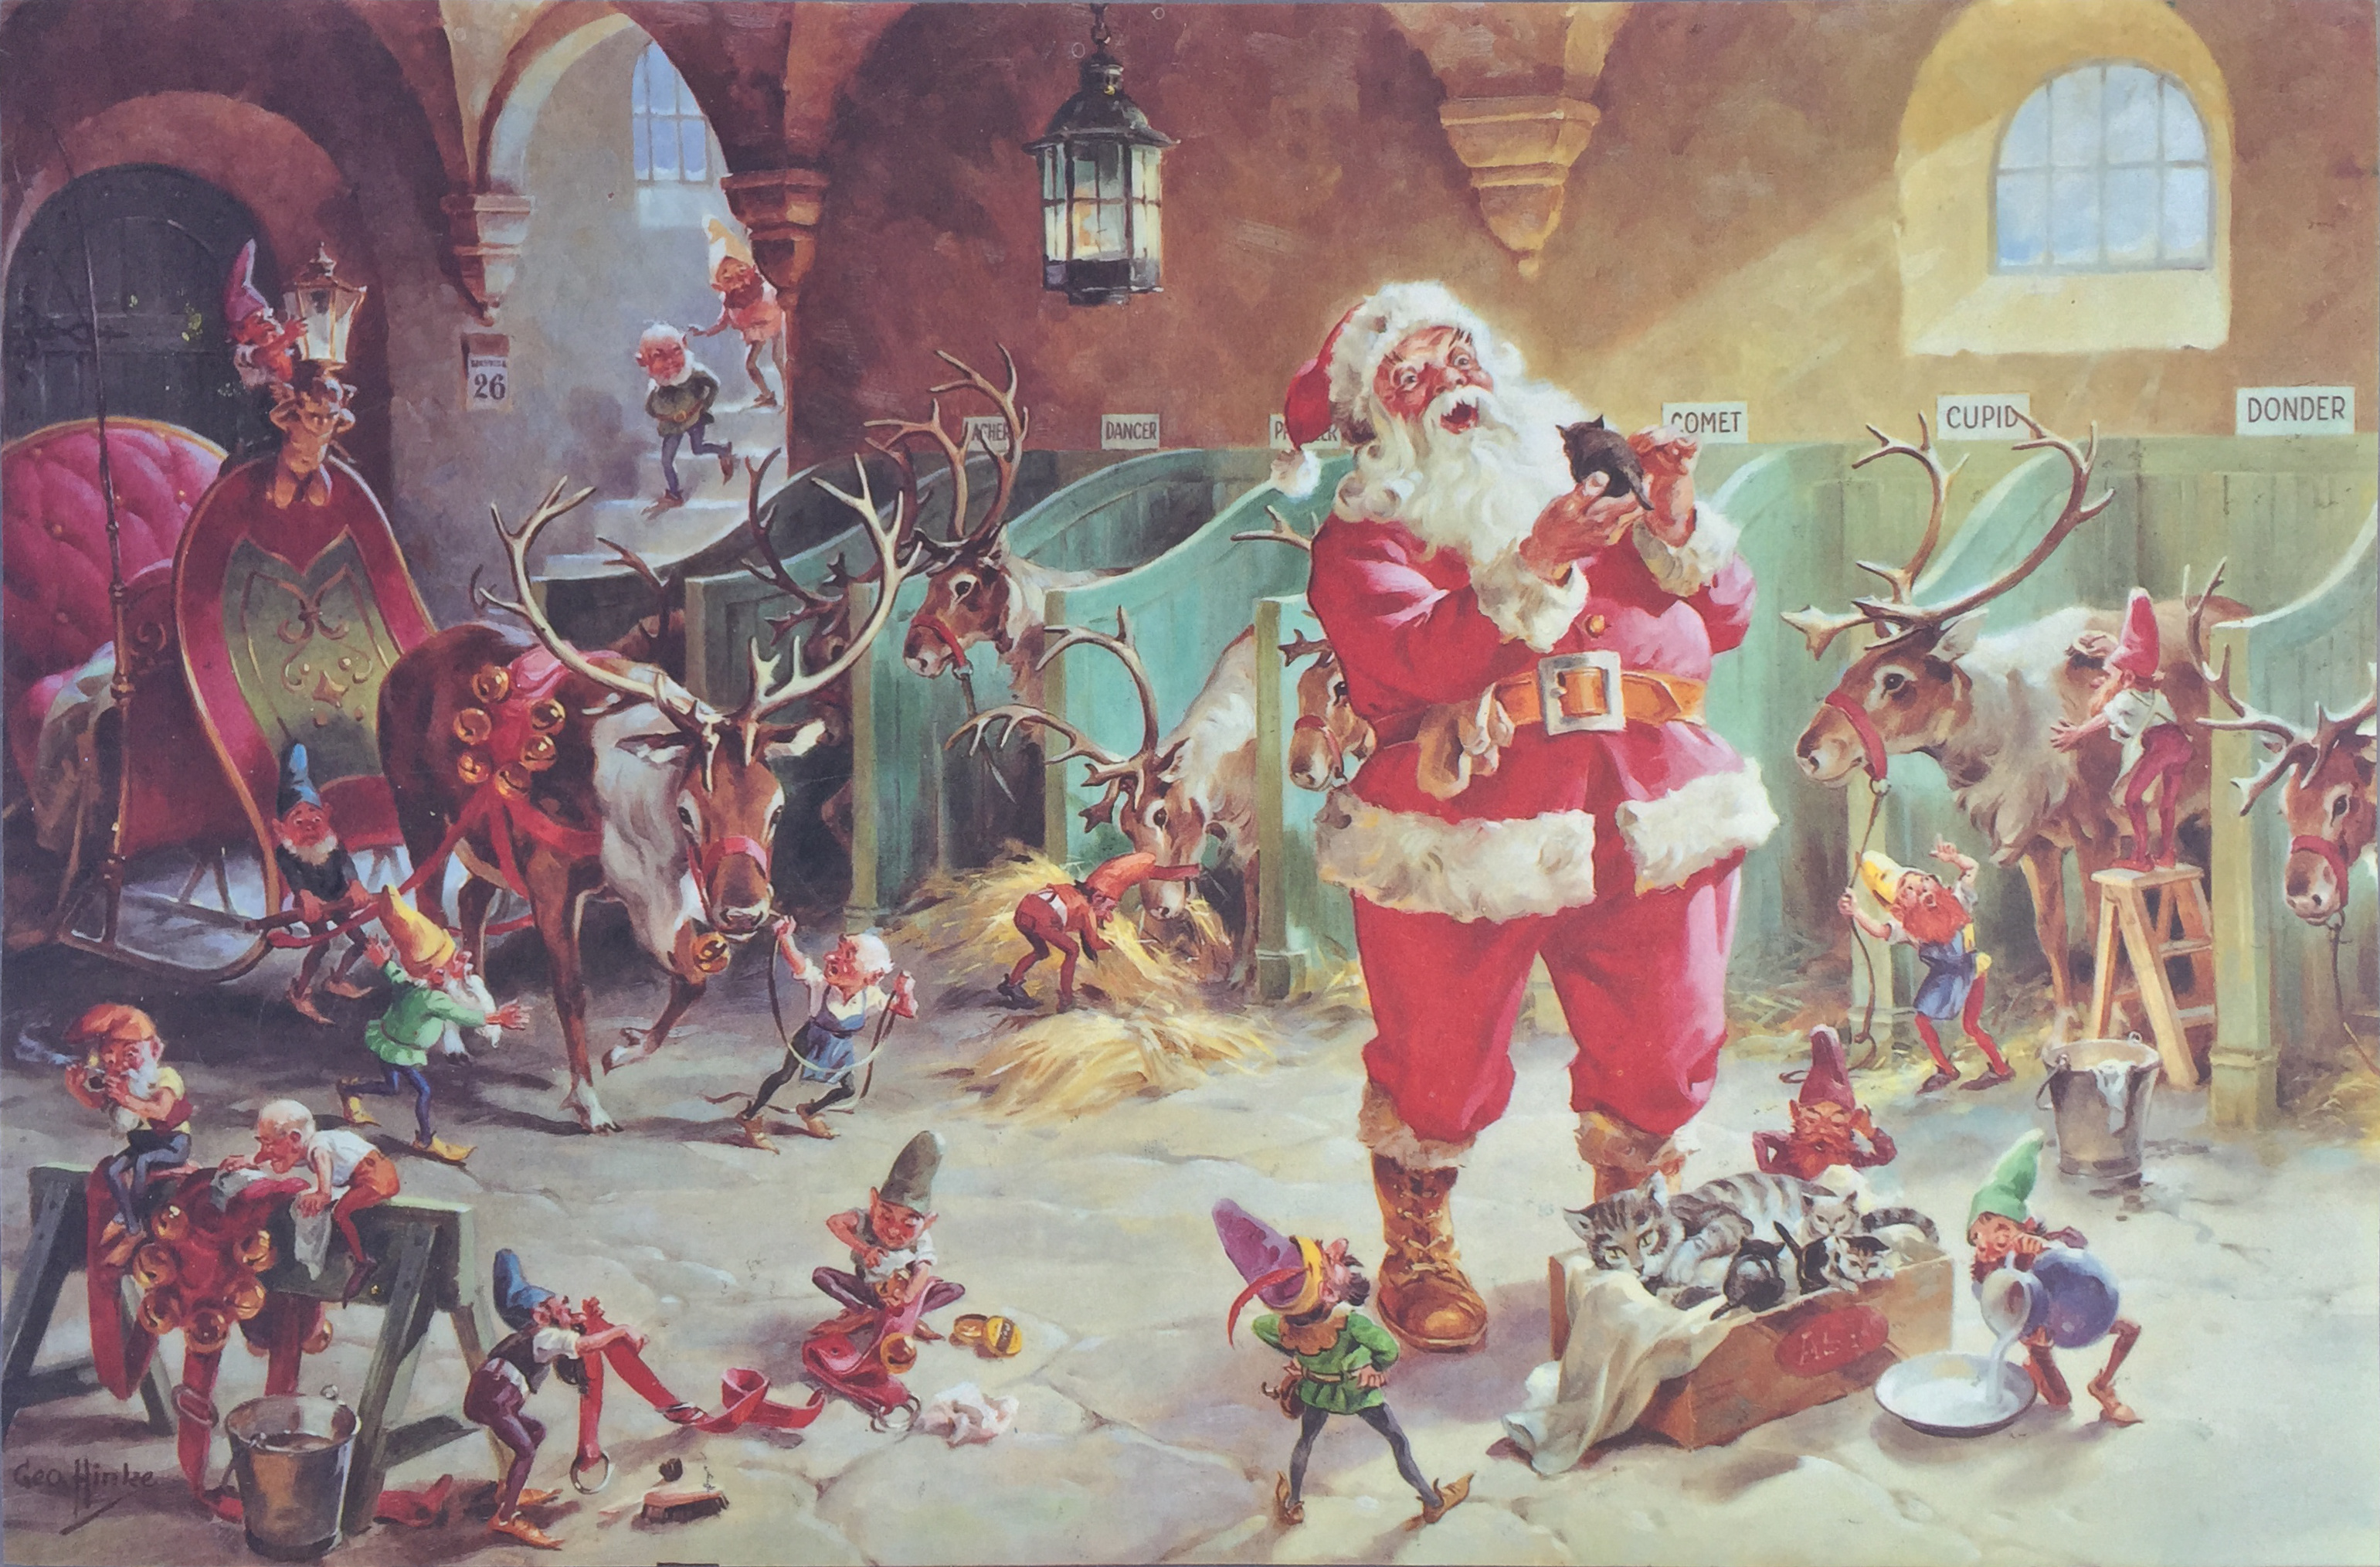
Santa Claus According to George Hinke

Every December for as long as I can remember, we’d eagerly retrieve our Christmas decorations from their long-boxed-up slumber. Probably the most prized of which were our Santa Claus dinner placemats, which depicted various scenes of St. Nick, Mrs. Claus, elves and reindeer all prepping for their Yuletide escapades. A little internet sleuthing revealed that these scenes were actually illustrations commissioned for a children’s book by the name of “Jolly Old Santa Claus,” painted by German/American artist George Hinke.

From the Museum of Wisconsin Art Website:
George Hinke was born in Berlin, Germany, in 1883 and schooled in a classic style of painting. Mr. Hinke came to Milwaukee, Wisconsin, in 1923, where he worked at a printing shop until he opened his own studio. From 1944 until Mr. Hinke’s death in 1953, Ideals commissioned him to create many works of art. In addition to Santa Claus, Mr. Hinke’s subjects included American small-town life, American flags, and religious scenes – all in his classic, nostalgic style. The paintings in the 1961 Ideals Magazine Collector’s Edition of Jolly Old Santa Claus are rendered in oil on stretched canvas. The influence of Mr. Hinke’s German background is evident in the Santa Claus series: from Santa’s castle, which resembles the castles of Bavarian King Ludwig, to the Black Forest clock on the wall of Santa’s workshop to the elves themselves, who are reminiscent of those characters in stone that decorate many German gardens.
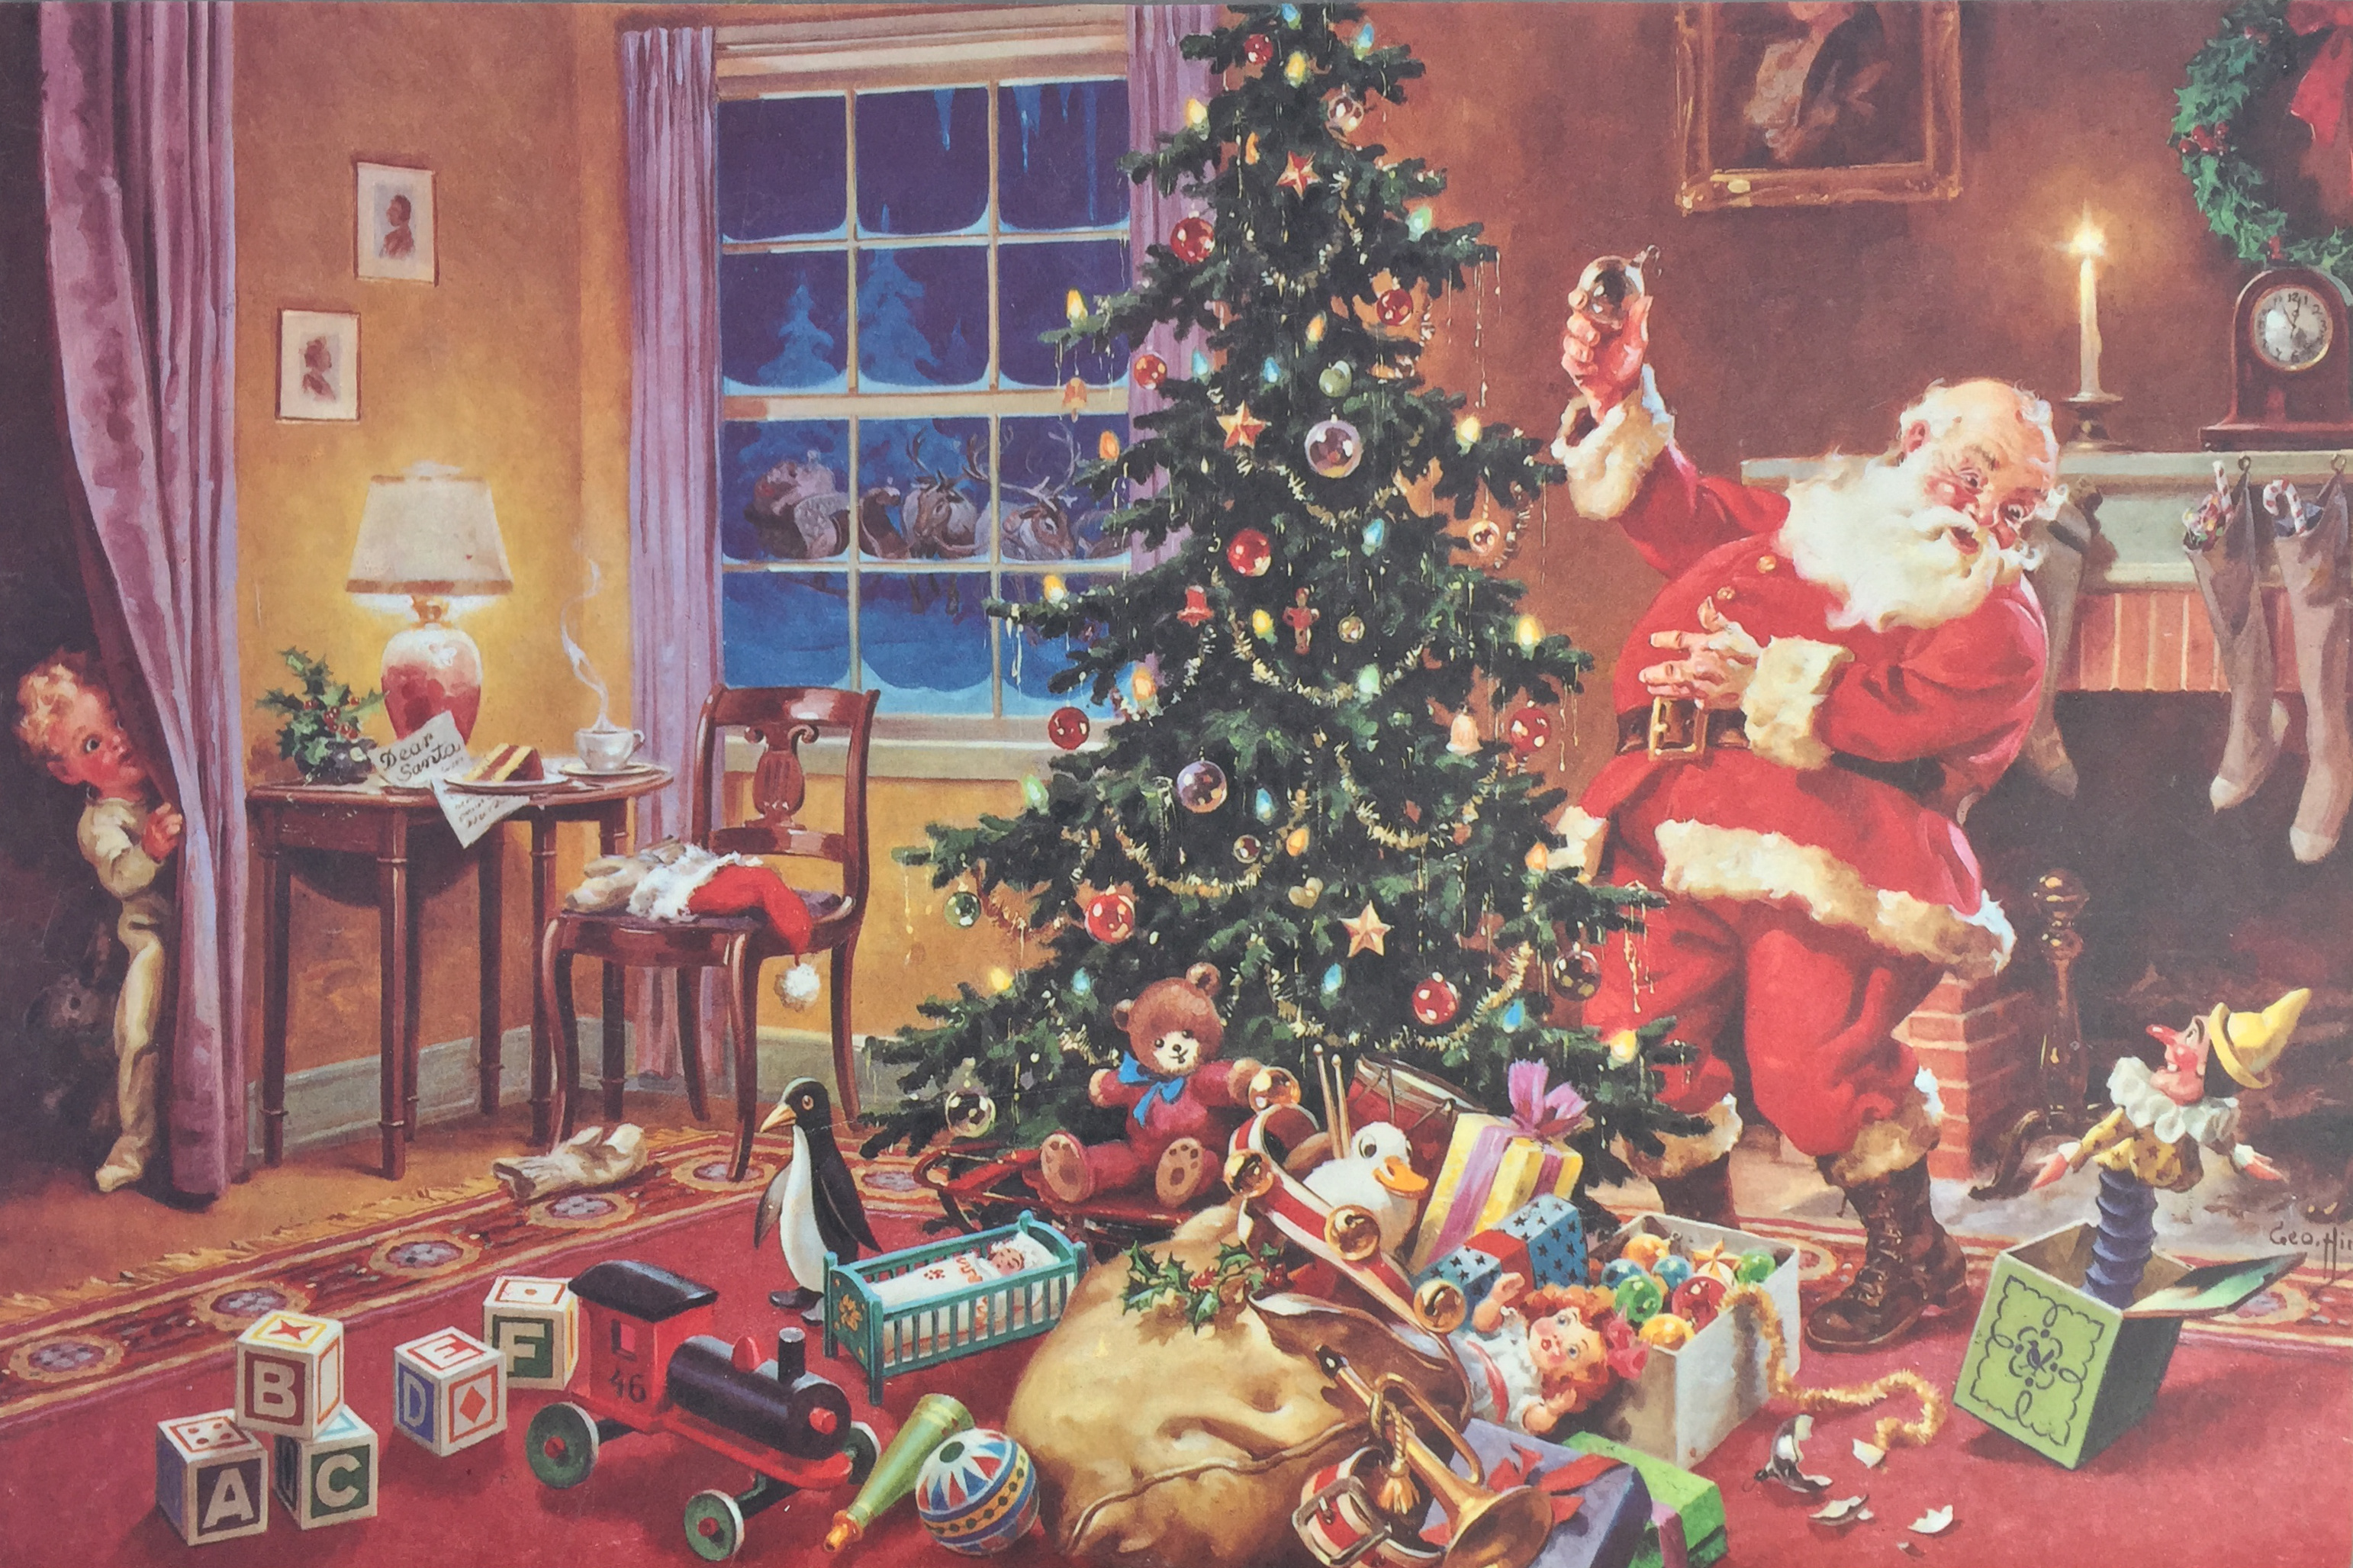
For me, these placemats provided the archetypal representation of what Santa Claus looked like — er, I mean — looks like, and all the little details were so fun and interesting to us as children. We still use them at mom and dad’s every year, and though the book can still be found easily enough through retailers like Amazon and Thriftbooks, actual full prints of the scenes are difficult to find. Thus I wanted to share them here for everyone to enjoy.
I’ve uploaded them here as HD photos taken with my iPhone 6 and cropped in GIMP. At some point perhaps I will use my limited photo-editing skills to restore some of the color and hide some of the placemat defects. But for now: Merry Christmas to all, and to all a good night!
UPDATE: Just a quick note that I had these photos (without any further editing) made into place mats via Snapfish. The process was super simple and the results were fantastic. I highly recommend it! Just be sure to use the Honey app or some other promo code provider to avoid paying the steep full price. I had 8 made for $65.
Links:
Marking One Year Since Caitlin's Surgery
Full disclosure, this is an extremely long post. But as July 13th marks one year since Caitlin's surgery to remove a tumor from her spine, I felt I really had to write everything down before I forget. Mostly because I don't want to forget the good deeds of so many people who helped us. But also so that when days are difficult, I don't forget just how much more difficult it was.
The first signs of Caitlin's condition had begun shortly after Jordan's birth in October of 2018. She began to complain of numbness in her legs and midsection. Seeming to worsen with the subsequent arrivals of Rosemary and Damian, nearly all medical professionals (and non-professionals like myself) simply didn't know what to make of it, and chalked it up to pinched nerves that hopefully would alleviate with time. But in the end, one professional deemed it worrisome enough - possibly MS - so as to recommend an MRI.
It was the Friday of Memorial Day weekend, the kids were finally asleep and I had just finished packing for our trip to Savannah the next day when Caitlin called from her MRI appointment: "Well, the good news is I don't have MS. The bad news is they discovered a tumor in my spinal column, and sent me immediately to the ER." Apparently the blockage of spinal fluid and pressure against her cord looked so advanced, the consulting doctor was shocked to discover she wasn't confined to a wheelchair. My brother in law generously came to stay with the kids, while I drove the (now all too familiar) 45 minutes to Fairfax Hospital.
Thankfully Caitlin was discharged, and we were able to make our trip the next day. No one knew for sure how much longer we could postpone addressing the issue, but the consensus was basically this: the numbness she had now would never abate, and would only get worse. Surgery might prevent future complications. However with a four month old baby and two other kiddos under four years, it seemed wise to wait as long as we could. We planned at the very least to wait until the fall, when Damian would be weaned.
However the next week, the symptoms grew worse, and the thought of sudden and permanent loss of mobility was a bit much to bear. We felt we couldn't wait, and scheduled the surgery as soon as possible. We tried to enjoy the next couple weeks pre-surgery, and prepared as best we could. We had no idea what lay ahead of us, but like most things in life, that's probably for the best.
Both sets of parents arrived ahead of time to watch the kids. My mom and dad brought custom printed purple t-shirts with Padre Pio's famous quote: "Pray Hope and Don't Worry". When we signed in at the hospital, I absent-mindedly placed my nametag over some of the text so that it read instead "Pray, Hope and Do Worry". That, coupled with the fact that the Liturgy of the Hours reading for that morning was from the book of Job should have keyed me into the gravity of the situation.
In the movies, there's always this great emotional scene when someone is wheeled off to surgery, a long drawn out goodbye while walking with the stretcher. But it's much different in real life. There was no heads up, we consciously had to pause the nurses from administering the sedative so we could have a rushed embrace. Then she was hurriedly wheeled off, while I was left to find my way back to the waiting room. There I sat, praying and trying to stay otherwise occupied. I didn't leave the room, for fear of missing a page. An hour passed, then two. I was hoping for a simple surgery where they could cut the tumor right off. After two hours passed, I knew that wasn't to be. Three hours passed, then four. At that point, I was thinking the surgery was not going well, that it was long, drawn out and complicated. What if she had permanent injuries? What if she was paralyzed? What if..? By the time the doctor walked out to discuss the results with me, I was beyond exhausted. I struggled to retain the words he was saying: That it was a tough tumor, that it was attached to the nerves and had to be dissected rather than easily cut out. That he got most of it but the exterior remained. That he had kept dissecting until sensors began to register that the nerves in her arm were being affected. I thanked the doctor and waited for the call with directions to Caitlin's location in the Neurological ICU.
I arrived at the room just as they wheeled Caitlin in. Her eyes were barely open as she looked amongst the doctors and nurses until she saw me in the room and smiled. She whispered something to me: "Bye, Felecia". Having no idea what she was talking about, she repeated herseIf several times until I remembered she had "named" the tumor Felecia. After a few minutes she began to become more and more lucid, and asked how everything went. My stomach was in knots as I relayed they had gotten most but not all of the tumor - I didn't want her to be upset at the news. Doctors came and went, always looking at her incision, and indicating it looked good. To me, it was totally gruesome and I had no idea how anyone could take a look without grimacing. We had awesome nurses, and were eventually moved to the Spinal Ward for further recovery.
This brings me to one of the more odd yet difficult complications we encountered: Caitlin was still breastfeeding Damian. Which meant that though she had pre-pumped milk for him at home, she had to continue to pump to keep up her supply. Initially we had assumed that of course the hospital staff could help, but this was not the case. Coupled with the fact that Caitlin could neither sit up, nor use her arms and hands meant that I had to pump her every few hours, half an hour at a time. We had to calculate which bags were tainted with medications and needed to be dumped, and which could be stored over ice. This also meant that I couldn't just come and go from the hospital easily to help at home.
And indeed, at home the kiddos were struggling. Jordan and Rosemary's behavior was bonkers as mom and dad weren't around. Everyone seemed to have a bad cold. Then Damian developed a croup cough, and had to be driven to Fairfax Hospital ER. There he and I sat, packed in with dozens of other children with similar RSV illnesses. Damian was a trooper, and after a few hours they administered some steroids to him while we waited on a bed in the hallway. It was busy and noisy, and I recall in the room next to us there was a man - probably in police custody - yelling and sobbing hysterically. Gladly, we were discharged a little after midnight. Sweating profusely, I carried Damian and all his gear back to the Spinal Ward. Visiting hours being over, we had to wait outside several minutes for special permission to bring him upstairs. After a quick visit with mama, I lugged him and all his stuff back to the parking garage, only to discover the car battery was dead. A guard was able to come by and jump start the battery, and I exhaustedly arrived home at 3AM for a couple hours of sleep. It was good to see the kiddos for a bit the next morning, but it was all too short as I had to hurry back to pump Caitlin again.
Caitlin was discharged from the hospital after about a week and a half, and like everything else it was both a blessing and a curse. On one hand, it meant she was making progress. On the other, it meant that I was now wholly responsible for caring for a spinal surgery patient who could barely walk, let alone use the bathroom, climb the stairs etc. Getting her inside the car outside the hospital was an ordeal in and of itself. After the long (and slow) drive back, my dad and I aided Caitlin up the walkway, through the door and up the stairs to bed. All was well for the night, or so we thought.
Caitlin's blood pressure runs pretty low. Couple that with meds that lowered it even more, and that meant she was liable to pass out anytime while moving. Case in point, that first night I helped her to the restroom, at which point she promptly passed out on the commode. There I crouched, holding her shoulders with my arms, and supporting her head with mine. No phone within reach, my mind racing with the terrible things that could happen should her neck shift the wrong way or she fell. After a minute she regained consciousness enough for me to run to get my phone. I dialed 911, then just crouched in the same position and prayed over and over. We heard the sirens wail, turn into our neighborhood, then pass right by our house to continue down the street. After re-dialing 911 to let them know they had missed our house, the crew finally arrived, came upstairs and were able to help Caitlin off the toilet and back into bed. Declining to be taken to the hospital, we thanked them and off they went. The kiddos slept through it all, including little Damian in the bassinet. We laid down for what little time we could, exhausted.
And that's the way it was for the next couple weeks: I was responsible for the feeding, wiping and bathing of everyone in the house. Everything was hard, sleep was interrupted by the medication schedule or bathroom trips. Daylight was spent hovering between child meltdowns and attending to Caitlin. My wardrobe became undershirts and gym shorts, my world was the house. I longed for things so simple as going for a walk, taking a shower or mowing the lawn. Silly, but I likened the experience to this: getting dragged under an 18-wheeler truck all day, then being released for a few hours at night only to hear the truck honking throughout letting you know it was coming for you again at daybreak.
Then hot one morning, I awoke to find our HVAC system had failed. I made a few rash decisions and paid way too much to have it patched before it failed completely a few days later. Caitlin was stuck in the hottest room in the house, and we couldn't easily move her. I didn't know what to do before two Seton families volunteered: one provided a brand new significantly discounted system, and the other paid for the difference. My brother in law brought a window unit to help us in the interim, and the poor baby-sitters never once complained about the heat.
That first checkup at Fairfax Hospital was hell: helping Caitlin down the stairs, then into the car. Then driving 45 minutes in the midday heat. The engine light came on at some point along 66, and I just couldn't bear the thought of what would happen if we broke down. At the hospital, Caitlin decided to use what turned out to be an extremely uncomfortable wheelchair, and as the minutes passed, she became increasingly worried she would pass out. We basically had to go up to the desk and plead to be taken back to just lie down. Thankfully they obliged, and after a few minutes of lying down she was feeling much better. We finished the appointment, and headed home.
Despite the difficulties, there were so many blessings: the work of great medical professionals, sitters and family members who helped with the kids, friends and coworkers who brought meals or gift cards. Volunteer nurses who gave up their precious free time to help with Caitlin's rehab. Some friends of ours started a GoFundMe and raised north of $27,000, not to mention the hundreds of cash gifts we received in the mail - all of which went toward medical bills and childcare. It truly felt like the ending of "It's a Wonderful Life". Normality sort of returned, as eventually I was able to get back to work, Caitlin was able to drive herself, and we got to attend family beach week in August.
We still have a long way to go, with more challenges ahead. Case in point, a few months back Caitlin alerted me to the very clearly printed word "malignant tumor" in her PT recommendation email from the surgeon's office. My heart sank. I did not sleep that night. The next day, the surgeon's office replied to Caitlin's email for clarification: "Sorry, clerical error." But very clearly, we are not out of the woods yet. I'd like to say Caitlin's back to normal, yet such normal things as unloading the dishwasher are very hard for her. I'd like to say it isn't still a roller coaster from time to time, yet many days I feel like I have to ask Caitlin if she feels well enough where I can even go to work. A few days ago she had a relapse of pain that basically crippled her for Independence Day weekend, and it was a stressful reminder of how bad things had been and still could be. We have many more expensive MRI’s and consults in our future, and something could always turn up. And working from home presents its own challenges - all three kiddos are screaming outside my door as I write this.
But I say all these things because: we know that God is good, and we are beyond grateful for the legions of people He has sent to show His goodness to us. Thank you to all of you amazing people for the thoughts, words, works and prayers: We love you all, and very literally could not have made it to this point without you! And most especially: please continue to pray for Caitlin's complete healing and for perseverance as we face the health (and childrearing) challenges ahead!
God Bless you all,
Bryan
Migrating a Django Project from SQLite to MySQL
I have several Django apps which are hosted on a Digital Ocean droplet, with development being done on my local Mac. For the most part, the initial SQLite setup works well, but for one of my larger projects I wanted to incorporate the use of MySQL. Here's how I went about the migration process:
Pre-Requisites
- A Django app which uses SQLite.
- MySQL is installed and running. See How to Install the Latest MySQL on Debian 10 tutorial for instructions on how to do this.
Recommended
- A thorough unit-testing framework for validating data integrity post-migration.
Setup the MySQL Database
The Digital Ocean tutorial How to Create a Django App and Connect it to a Database was very helpful helpful here. In a nutshell:
Open the my.cnf file for editing: vim ~/.my.cnf and add the following:
[client]
user = USERNAME
password = PASSWORD
detault-character-set = utf8
A couple of notes here:
First of all, the possible locations of the my.cnf file can be found via the following comand: mysql --help | grep "Default options" -A 1. Since this is for development purposes only, and to avoid any permission issues, I've chosen the simplest location within the user home directory.
Second, the setting default-character-set value in the tutorial was actually utf-8, not utf8. For whatever reason that tutorial value was causing "invalid character set" exceptions to be thrown when attempting to connect (though the alias in the Index.xml file should have sufficed). Regardless, the workaround was to use the exact name, utf8
Third, the tutorial indicates to set the database within the my.cnf file. This caused issues with running mysqldump later, so I found it better to remove it from the my.cnf file, and add it within the name property of the DATABASES setting with Django.
Install mysqlclient Package
Next we'll need to install the mysqlclient package. You can do this via pip individually, or via requirements file:
# requirements.txt
...
mysqlclient==2.1.0
Then install via pip:
(venv) $ pip install --upgrade pip
(venv) $ pip install -r requirements.txt
When doing this initially however, I ran into what seemed to be an egg issue which resulted in a "No matching distribution found for mysqlclient" exception. What ended up being the issue was a lack of Python 3 headers for the install mysql version, and this was resolved by following the "Install" instructions within the PyPi mysqlclient page. After that, the pip install worked fine.
Update Django DATABASES Settings within settings.py
Next we'll take the existing default database Django settings and re-define them as legacy so we can continue to reference them, while defining MySQL as our new default database. Note that we add the 'NAME' attribute for the database, since we didn't define it within my.cnf. Also note that the username segment of the read_default_file value needs to be changed to reflect the actual user directory on your computer.
DATABASES = {
    'legacy': {
        'ENGINE': 'django.db.backends.sqlite3',
        'NAME': BASE_DIR / 'db.sqlite3',
    },
    'default': {
        'ENGINE': 'django.db.backends.mysql',
        'NAME': 'DATABASE',
        'OPTIONS': {
            'read_default_file': '/Users/username/my.cnf',
        },
    },
}
Run Database Migrations Against MySQL Database
Run the following to build out the database tables within the newly created "default" MySQL database: (venv) $ python manage.py migrate --settings path.to.settings --database default
Dump Existing Data
To transfer the from one datbase to the other, I used the dumpdata and loaddata commands from Django fixtures.
To dump the existing SQLite data:
(venv) $ python manage.py dumpdata --settings path.to.settings --database legacy -o data.json --exclude contenttypes
Note that I excluded contenttypes here, as including that data was causing integrity errors later with loaddata.
Then, load the data into the "default" MySQL database:
(venv) $ python manage.py loaddata data.json --settings path.to.settings --database default
If all went well, you should be able to startup a development server and browse around your site. Be sure to run tests to ensure everything migrated properly. When all looks good, it's probably also a good idea to remove the legacy database settings and file.
Links:
Streaming Synology Diskstation Video Through Apple TV With Plex
My wife's been shaking her head at me the past few months as I was slowly but surely converting our DVD collection to our home Synology Diskstation NAS. This was particularly because we had a super old Apple TV, and could only stream them via Airplay. The quality and interface was.. not so great.
However, for our anniversary I bought the latest generation Apple TV, installed Plex (on both the Apple TV and NAS), and via the below tutorial, was able to setup a streaming interface of our DVD collection better than I could have imagined:
https://www.youtube.com/watch?v=Z7LfXVVfYhI
There was only one wrinkle in my setup however: I wanted to keep our videos under /Volume1/video/* as opposed to /Volume1/Plex/Library/*, especially because keeping them in the former location allowed us to continue to stream videos on our phones and iPad via DS File, while Plex allows only free streaming to Apple TV.
So the obvious solution was to create symlinks from video/* to Library/*. However when doing so, Plex could see the directory but not access it. Searching Google showed various hacks to enable Plex access, but the actual solution was quite simple: the plex user on the Synology Diskstation simply needed read access to the video/* directory.
Super simple, and worked like a charm. Happy streaming!
Installing and Configuring MySQL
This article is more of a cheat-sheet for myself, and less of a public facing post, but hopefully it can help someone else out.
Install and Start MySQL
Install MySQL using Homebrew: brew install mysql
If MySQL has not been added to the system path, run the following: export PATH=$PATH:/usr/local/mysql/bin
Create a User, Privileges and Password
Login to mysql as root: mysql -u root
Create user: mysql> CREATE USER 'username'@'localhost';
Grant all privileges: mysql> GRANT ALL PRIVILEGES ON *.* TO 'username'@'localhost';
Run the following:
mysql> USE mysql;
mysql> UPDATE user SET authentication_string='password' WHERE User='username';
mysql> FLUSH PRIVILEGES;
mysql> quit;
Alternatively (as of version 8.0.15), the password can be updated:
mysql> USE mysql;
mysql> ALTER USER 'username'@'localhost' IDENTIFIED BY 'password';
mysql> FLUSH PRIVILEGES;
mysql> quit;
You now should be good to create a local database connection for the newly created username.
Create Database
mysql> CREATE DATABASE databasename;
Delete Database
mysql> DROP DATABASE databasename;
Why Django, Why?
One year ago, I was riding pretty high. Well, at least website wise. I'd successfully migrated my old Wordpress site from Bluehost to my Synology Diskstation. It was a little painful at first, but eventually I was able to successfully serve my own website from my own home.
There were some initial tradeoffs during that initial process of course. I wasn't able to peform a total rebuild in Django as I'd intended, due to the NAS being more configured for Wordpress hosting and any alterations to the serving configs could be wiped out by an update. So I settled for Wordpress for my own site, and was still able to install and use Python/Django for some side projects. Things were pretty great.
Then one morning, I was greeted in my office with the dreaded "System Crash" beeps. My volume had crashed, and I'd lost all my site data on the NAS. And I thought, "Aha, lesson learned: always backup your ish." Thankfully I had my Bluehost Wordpress backup, as well as some project stuff in git and was able to rebuild with minimal data loss. And I conigured a pretty thorough redundant backup system to prevent another such loss.
I did say *pretty* thorough, because of course it happened again. And I found I hadn't redundantly back-ed up everything. So my next lesson was, "Just because you can serve things on from a home NAS doesn't mean you should." It's simply not optimized for web hosting, installing packages was a pain, and I suppose there's no telling whether the crashes were just fate, or malicious. In any event, I swam for the open waters of Digital Ocean.
And it's been pretty good so far. Setting up a Django site was a breeze, and it sure feels nice to be free from the structures of Synology and bloat of Wordpress. Obviously it's a work in progress: the design so far is bare HTML and restoring and re-routing my old posts will be a bit of an adventure. But I'm looking forward to it!
Georgetown
star dot ico
- Using an image editor (cheap, Windows junkie I am, I use GIMP), create an image 64px x 64px.
- Design your image, but remember it's going to have to look great as 16px x 16px. Less it more. Mine is the letter "b". I am also not a designer.
- Scale the image to 16px by 16px.
- Save or export your image as a "favicon.ico". If that extension is not possible with your image editor, you can either (a) get a plugin, or (b) save it as a GIF, JPG or PNG and Google any number of favicon generators out there... those can be hit or miss though.
- Upload the "favicon.ico" image to your site. Often, this will be the root directory. But in my case, Wordpress was looking for the image elsewhere based on a link tag with the attribute of "shortcut icon". In that case, I'd rename the existing image to archive it, and upload your new image there.
- Ensure the aforementioned link tag is in fact pointing to your new image. If the tag does not exist, it's not a terrible idea to add it to the
<head>block:<link rel="shortcut icon" href="favicon.ico" /> - You may need to flush your browser's cache in order to get it to show up properly.
Back From Bristol
 March 11 was my last day working at ESPN. After nearly three and a half years working for "The Worldwide Leader," I've accepted a very exciting Senior Web Developer position at "US News and World Report" for their Travel and Auto vertical, located in the Georgetown sector of Washington D.C.
There have been so many memories from ESPN through those few years: From Magical Unicorns to Deadspin announcing layoffs during the summer of 2013. From crazy "Reply-All" e-mail threads to the annual NCAA tournament pot-luck. From the Ooyala Video Migration to Jim Abbot pitching batting practice.
Trying to "steal" Rita LeBlanc's Super Bowl Ring...
[caption id="attachment_244" align="aligncenter" width="300"]
March 11 was my last day working at ESPN. After nearly three and a half years working for "The Worldwide Leader," I've accepted a very exciting Senior Web Developer position at "US News and World Report" for their Travel and Auto vertical, located in the Georgetown sector of Washington D.C.
There have been so many memories from ESPN through those few years: From Magical Unicorns to Deadspin announcing layoffs during the summer of 2013. From crazy "Reply-All" e-mail threads to the annual NCAA tournament pot-luck. From the Ooyala Video Migration to Jim Abbot pitching batting practice.
Trying to "steal" Rita LeBlanc's Super Bowl Ring...
[caption id="attachment_244" align="aligncenter" width="300"] Rita LeBlanc's Super Bowl Ring.[/caption]
Conquering the Mt. Snow with the Tough Mudder Crew...
[caption id="attachment_243" align="aligncenter" width="300"]
Rita LeBlanc's Super Bowl Ring.[/caption]
Conquering the Mt. Snow with the Tough Mudder Crew...
[caption id="attachment_243" align="aligncenter" width="300"] ESPN's EXT Team: Tough Mudder, 2011.[/caption]
Shark attacks...
[caption id="attachment_248" align="aligncenter" width="300"]
ESPN's EXT Team: Tough Mudder, 2011.[/caption]
Shark attacks...
[caption id="attachment_248" align="aligncenter" width="300"] We're gonna need a bigger boat.[/caption]
The Stanley Cup...
[caption id="attachment_250" align="aligncenter" width="224"]
We're gonna need a bigger boat.[/caption]
The Stanley Cup...
[caption id="attachment_250" align="aligncenter" width="224"] The Stanley Cup comes to visit ESPN.[/caption]
Imperial entanglements...
[caption id="attachment_249" align="aligncenter" width="300"]
The Stanley Cup comes to visit ESPN.[/caption]
Imperial entanglements...
[caption id="attachment_249" align="aligncenter" width="300"] You do not know the power of the Dark Side... we have cookies.[/caption]
[caption id="attachment_247" align="alignright" width="300"]
You do not know the power of the Dark Side... we have cookies.[/caption]
[caption id="attachment_247" align="alignright" width="300"] Blizzard of February, 2013.[/caption]
Through hard times like numerous blizzards, two earthquakes, two hurricanes, the "Franken-Storm", Newtown and the Boston Marathon Bombing...
Through three reorganizations...
Through working with all the various groups at ESPN: Sports Production, API group, X-Games, International, Editorial and WatchESPN...
It was a blast working with such talented and fun people.
[caption id="attachment_246" align="alignleft" width="300"]
Blizzard of February, 2013.[/caption]
Through hard times like numerous blizzards, two earthquakes, two hurricanes, the "Franken-Storm", Newtown and the Boston Marathon Bombing...
Through three reorganizations...
Through working with all the various groups at ESPN: Sports Production, API group, X-Games, International, Editorial and WatchESPN...
It was a blast working with such talented and fun people.
[caption id="attachment_246" align="alignleft" width="300"] My brother Matty and I on the ESPN News set.[/caption]
My only regret is that I never got into a "This is Sportsceneter" spot like Lucas and Wong. Though is that really Wong in the green shirt? Now I'm not so sure...
Oh well, there are days when this might as well be me.
So as honestly as I can, to all those that I had the pleasure of working with or knowing, I'd like to say: thanks.
Please keep in touch!
My brother Matty and I on the ESPN News set.[/caption]
My only regret is that I never got into a "This is Sportsceneter" spot like Lucas and Wong. Though is that really Wong in the green shirt? Now I'm not so sure...
Oh well, there are days when this might as well be me.
So as honestly as I can, to all those that I had the pleasure of working with or knowing, I'd like to say: thanks.
Please keep in touch!Quieres construir un muñeco de nieve?
 The Marian statue atop the "Panecillo" in the background.[/caption]
Last week, my brother Matthew, my sister Lisa, her husband (Tim), their two daughters (Evangeline and Audrey) and I were fortunate enough to visit my sister Michelle and her family in Quito, Ecuador. Quito is the world's highest capital city, and you notice the altitude right off the bat - with an elevation of 9,350, it's almost twice as high as Denver, CO. Simply walking up the stairs becomes no easy task, much less chasing the nieces and nephews up and down.
[caption id="attachment_189" align="alignright" width="300"]
The Marian statue atop the "Panecillo" in the background.[/caption]
Last week, my brother Matthew, my sister Lisa, her husband (Tim), their two daughters (Evangeline and Audrey) and I were fortunate enough to visit my sister Michelle and her family in Quito, Ecuador. Quito is the world's highest capital city, and you notice the altitude right off the bat - with an elevation of 9,350, it's almost twice as high as Denver, CO. Simply walking up the stairs becomes no easy task, much less chasing the nieces and nephews up and down.
[caption id="attachment_189" align="alignright" width="300"] Flowers along "Seven Crosses Road".[/caption]
Though it's on the equator, Quito's temperature rarely ranges outside of a 70-50 degree zone, and its only seasons are "Dry" and "Rainy" (it rained nearly every day). That fact that they use a similar enough electrical voltage as the US was handy for charging mobile devices, as well as the fact they are also on the US dollar - though be aware that because of a "change shortage," bills as large as a twenty were all but useless because many vendors would not accept them.
[caption id="attachment_182" align="alignright" width="300"]
Flowers along "Seven Crosses Road".[/caption]
Though it's on the equator, Quito's temperature rarely ranges outside of a 70-50 degree zone, and its only seasons are "Dry" and "Rainy" (it rained nearly every day). That fact that they use a similar enough electrical voltage as the US was handy for charging mobile devices, as well as the fact they are also on the US dollar - though be aware that because of a "change shortage," bills as large as a twenty were all but useless because many vendors would not accept them.
[caption id="attachment_182" align="alignright" width="300"] Evangeline's all set for the tour of Quito.[/caption]
[caption id="attachment_184" align="alignleft" width="300"]
Evangeline's all set for the tour of Quito.[/caption]
[caption id="attachment_184" align="alignleft" width="300"] Basílica del Voto Nacional, Quito[/caption]
At any rate, the first day out and about was spent on a bus tour that took us through the city, it's historical sector, and "el Panecillo", a central hill at about the center of the city that sports a statue of the Blessed Mother and a 360° degree view of the city, its surrounding hills and dormant volcano.
[caption id="attachment_177" align="alignleft" width="225"]
Basílica del Voto Nacional, Quito[/caption]
At any rate, the first day out and about was spent on a bus tour that took us through the city, it's historical sector, and "el Panecillo", a central hill at about the center of the city that sports a statue of the Blessed Mother and a 360° degree view of the city, its surrounding hills and dormant volcano.
[caption id="attachment_177" align="alignleft" width="225"] Malia getting one of the butterflies to land on her finger.[/caption]

 Next stop was the remote town of Mindo, about 2 hours northeast of Quito - easily the most remote place I've ever been. While rumbling along the road of mud, you half expect a pack of Velociraptors to rush from the bush. Our destination was the Mariposas Butterfly Garden, where they raise over 40 species of butterfly within a netted, walking environment. After a long St. Patrick's day lunch at El Quetzal De Mindo (where they make their own chocolate and beer amongst other things), we made our way back to casa Hilleary for dinner and a traditional viewing of "Darby O'Gill" via the projector.
There are two equator museums in proximity to Quito: one on the equator itself, and one - more picturesque - that sits about about 250 yards from 0'0". Not exactly sure how they screwed that one up, but regardless we visited the former - and I'm glad we did. One of the features of the real museum is that there's all sorts of cool experiments you can do such as balance eggs and drain water straight down (even six feet to the right or left causes the water to spiral). Also cool were the native american exhibits, specimen of the local fauna such as the "Goliath birdeater" tarantula, and even the ancient shrunken head of a 12 year old boy... hmm.
In between all the action out and about, hanging out with the fam at "Casa Hilleary" was a blast. The movie "Frozen" was definitely the feature of the week with two showings and daily soundtrack plays - I especially enjoyed screwing up the lyrics to annoy the kids. Shay was able to construct a Duplo tower to the ceiling of the play room, and the compound's trampoline was a big hit for all, especially Evangeline. All in all, just a great country to visit, with such gracious and generous hosts.
[caption id="attachment_181" align="alignleft" width="225"]
Next stop was the remote town of Mindo, about 2 hours northeast of Quito - easily the most remote place I've ever been. While rumbling along the road of mud, you half expect a pack of Velociraptors to rush from the bush. Our destination was the Mariposas Butterfly Garden, where they raise over 40 species of butterfly within a netted, walking environment. After a long St. Patrick's day lunch at El Quetzal De Mindo (where they make their own chocolate and beer amongst other things), we made our way back to casa Hilleary for dinner and a traditional viewing of "Darby O'Gill" via the projector.
There are two equator museums in proximity to Quito: one on the equator itself, and one - more picturesque - that sits about about 250 yards from 0'0". Not exactly sure how they screwed that one up, but regardless we visited the former - and I'm glad we did. One of the features of the real museum is that there's all sorts of cool experiments you can do such as balance eggs and drain water straight down (even six feet to the right or left causes the water to spiral). Also cool were the native american exhibits, specimen of the local fauna such as the "Goliath birdeater" tarantula, and even the ancient shrunken head of a 12 year old boy... hmm.
In between all the action out and about, hanging out with the fam at "Casa Hilleary" was a blast. The movie "Frozen" was definitely the feature of the week with two showings and daily soundtrack plays - I especially enjoyed screwing up the lyrics to annoy the kids. Shay was able to construct a Duplo tower to the ceiling of the play room, and the compound's trampoline was a big hit for all, especially Evangeline. All in all, just a great country to visit, with such gracious and generous hosts.
[caption id="attachment_181" align="alignleft" width="225"] That's a load-bearing pillar now, Shay.[/caption]
[caption id="attachment_196" align="alignright" width="225"]
That's a load-bearing pillar now, Shay.[/caption]
[caption id="attachment_196" align="alignright" width="225"] Evangeline "fishing" for Koi.[/caption]
RE: Reply All
Let the Madness Begin
 In all fairness, it's a well deserved reward for all of the hard work the teams put into their NCAA Basketball products before the mandatory tournament "code freeze" goes into effect. As well, this year we had quite pot-luck spread: wings, dips, meatballs, chips, cookies, veggies, fruit... and best of all, pizza. Almost takes the sting from my busted bracket.
But I'm having a conundrum: with VCU and Georgetown now out of the mix, I really don't have a horse in this race. So who to root for... Coach Larranaga and Miami (gasp)? Gonzaga?? Michigan??? Or maybe it's just time to throw my attention towards Baseball and warm thoughts of Spring and Summer to come. Hmm...
Let's go O's!
In all fairness, it's a well deserved reward for all of the hard work the teams put into their NCAA Basketball products before the mandatory tournament "code freeze" goes into effect. As well, this year we had quite pot-luck spread: wings, dips, meatballs, chips, cookies, veggies, fruit... and best of all, pizza. Almost takes the sting from my busted bracket.
But I'm having a conundrum: with VCU and Georgetown now out of the mix, I really don't have a horse in this race. So who to root for... Coach Larranaga and Miami (gasp)? Gonzaga?? Michigan??? Or maybe it's just time to throw my attention towards Baseball and warm thoughts of Spring and Summer to come. Hmm...
Let's go O's!